Showing posts with label 3-D projects. Show all posts

Wednesday, January 7, 2009

Pretty Pink

I'm in Orlando gearing up for Stampin' Up!'s Leadership conference!  I'm here with two good friends that I met through SU!  I made them a little gift over the holiday break.  I found these vinyl spa bags on accident after Christmas at HEB of all places.  They were the right price and I thought I might be able to use them.  They aren't as electric pink as they seem in this photo.  I couldn't get a good shot with the true color.   Picture 013

  I used some Chocolate Chip Rub Ons to decorate the bag and metal tag.  All of this is retired, but could easily be substituted with stuff you have in your stash or with current product!  :-)


In the bag I included a chipboard calendar, these yummy chocolates, and a bag tag.  The chocolate is in a tin decorated with the new Love You Much Stamp set.  So easy!

Picture 005


At each Leadership or Convention, we receive a bag with our stamp set(s) and other goodies.  This year we'll also get the 2009 Spring/Summer Idea Book and Catalog in it!  Thousands of demonstrators with the same bag...oh my....so this is a way to help us tell our bags apart quickly.  :-) 

Picture 008 


I got the tags from Oriental trading and decorated them using some of our pretty DSP, on board chipboard coated with craft ink and embossed using iridescent ice embossing powder, and some of our great designer brads!  Here's a closer look at one of them. Picture 010


This paper is new DSP from the new catty.  It's called Rasberry Tart.  Of course I used a mostly kiwi kiss sheet on two of these...doesn't look very rasberry-ey or tarty!  The middle one uses the soon to be retired Maine Blueberry DSP.  My friend REALLY likes blue!  I hope they like their bags! 

I hope to report back to you later today new and exciting things coming our way!

Sunday, January 4, 2009

Live Like You Mean It!

Happy New Year! 

This calendar is one of the projects we made at the gift camp (now months ago!), but perfect for January!  live like you mean it We used two chipboard coasters and covered them with gorgeous paper (Haiku in this sample) and cardstock on the back.  It's "bound" with ribbon.  The stamp set is one of the level 1 hostess free sets called "Live Like you Mean it" (and is only available until January 18th - quick schedule a party!)  I just LOVE that statement!  And, of course, I think it is perfect for a calendar so I (or a recipient of this as a gift) can be reminded to live every moment and not take anything for granted.  You can't see it too clearly on this sample, but 'live like you mean it" is embossed in black under the months.  I designed it so a photo could be added.  So perfect for any workspace!llymit with picture

I got the coasters from a demo friend who ordered a gazillion of them.  Mine are plain vanilla-ish in color.  They were super cheap, but I don't know where she actually purchased them.  I'm sure a quick google search will provide you with numerous sources!  Now, you could reuse the coasters you get when you go out to dinner at any of the great restaurants that use these types of coasters (Chili's and Outback come to mind immediately), I've been told that some restaurants will actually let you take some that haven't even been used...what a bonus!  I adhered the paper with my glue stick and punched holes with my crop-a-dile.  Colors on this one are Tangerine Tango and More Mustard.  The numbers are from a retired stamp set, Straight Up alphabet and numbers.  The calendar came from an excel template.  You can e-mail me if you need it.  Here are some other calendars made by....ummm...it's been so long, I don't remember!  Enjoy!

gift camp gift camp2 This one uses Maine Blueberry Paper


and this one uses Frosty Day from the Holiday Mini Catalog.

Monday, December 1, 2008

Domino Frame

P1010012

This was another project we did at the gift camp.  Again, this was inspired by a swap I received at convention.  Unfortunately, I cannot find the name of the person who swapped this!  The frame is a $1 frame from Michaels (although apparently they are now in short supply here in the Austin area).  Images were stamped in Stazon and colored in with chalk.  At Saturday's camp, Lucinda shared that she has started sealing her dominos (she makes gorgeous jewelry with her dominos) with floor wax....BRILLIANT!!  If you keep floor wax in one of your aqua painters like I do, this is so easy to do!  Here are some of the ones that were made at camp:

P1010305 P1010313_edited

P1010012_edited Again, I missed several people's frames!

Sunday, November 30, 2008

Stationary Box

Yesterday was the second round of Gift Camp.  I look forward to this camp every year, although I spend many months worrying if the projects will be as satisfying to everyone as last years, or the year before that, or the year before that... The stationary box was one of the projects this year I included and although it was a bit frustrating at first with some of the scoring and cutting, it was a great project and they turned out so beautiful!  One of my friends requested that I do this project in the gift camp and coincidently I received one in a swap at convention from Donna Henley.  The pattern from the box can be found here.  Here's the sample I made for the class:

P1010020

P1010021

P1010022

P1010023

I think some of the boxes left without being photographed (camera shy at such a young age!), but here are some of the great boxes that were created.  If you need details on supplies, e-mail me and I'll be happy to fill in the gaps.

It's been awhile since the first camp, I think this one is Jeanette's.

P1010303

I think Mary Alice's.

P1010306_edited

Teri's

 P1010312

Nancy's

P1010314_edited

Ashley's

P1010002

Lucinda's

P1010009_edited P1010010

I'll make corrections as my wonderful stampin' friends refresh my memory!  And, I'll post the others if I can get pictures of them.  Aren't they beautiful??!!

Thursday, November 27, 2008

So Thankful!

Happy Thanksgiving! I love Thanksgiving because it is the perfect holiday (in my humble opinion)...there is no expectation of gifts, so no stress about finding the right present, just the gift of presence! Don't get me wrong I love presents...in fact, feel free to send me presents any time you want! I just love that we all recognize at least once a year to be grateful for all that we already have, not necessarily what we are about to receive! Like many others, I feel blessed that I have so much to be thankful for: I have two beautiful and vivacious children, a truly caring and loving husband, 2 devoted dogs who love us unconditionally, 2 cuddly cats who allow us to be in their lives, extended family who love and support us no matter what we do, and countless friends to laugh (and sometimes cry) with who have become much like family! I am grateful for all the people who give of themselves so we all can live safely (soldiers, police, firefighters, etc)! In a time of uncertainty in our economic world, I feel fortunate to have a job that I love and that is secure and that stretches me intellectually...I truly learn something new every day. After my recent trip to Ohio I am also reminded of how thankful I am to be living in Texas where snow and sub-freezing weather is so rare!!! And, of course, I'm grateful for stamping and the art of paper crafting in general! I have learned that even I can be creative and I'm quite sure I have been spared countless hours and thousands of dollars in therapy! (However, it really has impacted my ability to maintain a clean and clutter free home!) And then there are all the people I have been so fortunate to meet who share the same passion for creating! I am grateful for all of you! (especially if you are still reading!) Lastly (or at least for now), I am grateful for my health. I'm so happy I have the opportunity to wake up each day, breathe the wonderful (and usually warm and sunny) fresh Texas air, and do whatever is in store for the day! Isn't life great??
For those of you just visiting my blog for the ideas....here's a project we made at stamp club this month that suits the day.

P1010034_edited

This is a card portfolio made with large envelopes. Unfortunately, when we made this I didn't realize that Stampin' Up! no longer carries this size of envelope, but if you can't find them at your favorite craft or office supply store, SU does carry a large square envelope that works as well. You attach the two envelopes together and insert these note cards and matching envelopes into the two pockets.

P1010032 P1010033

I forgot to snap a picture of the inside of the portfolio, so if this doesn't make sense e-mail me and I'll try to give you improved directions! The cards were super simple. This project uses the Season of Friendship and Thank You Kindly stamp sets. The Autumn Vine DSP coordinates perfectly with the stamp set and the colors are pulled directly from there: Sage Shadow, More Mustard, Really Rust and Chocolate Chip. Circle Punches make putting the whole thing together fast and easy!
Happy Thanksgiving to all of you. I'd love it if you would leave a comment and share what you are thankful for!

Monday, November 24, 2008

Let the Countdown Begin

P1010009

This was supposed to be yesterday's post, but alas, I ran out of hours in the day! So really it should say 31 days. How fun is this?? I put this together very quickly on Saturday afternoon after unpacking some Stampin' Up! boxes that were delivered while I was away. This is the small Christmas Countdown Decor Elements found on page 4. This is obviously in red, but it is also available in Old Olive and Chocolate Chip. The board is a dry erase/bulletin board combo that I just happened to have lying around in my craft room...REALLY! I'm sure it was destined for some other equally awesome project, but it looked perfect for this one. For those of you with no hoarding issues I believe you can find this particular one at Hobby Lobby for under $10 or at your favorite craft or office supply store. I covered the bulletin board portion with retired Certainly Celery Prints Designer Series Paper. Since becoming a regular member of Designer Paper Hoarders Anonymous I have begun tapping into my stockpile of beautiful paper. Through this marvelous program I have learned that there will always be beautiful paper available...I can use what I have and I can order more and even if it is not exactly the same, it will be very lovely and I will be OKAY! Christmas Countdown comes with numbers 1 - 25 so you can begin your countdown on December 1st every year. Some brilliant demonstrator mounted her numbers on a magnet sheet and cut them out so she can countdown starting December 26th and go year round! Loved the versatility of that idea...hated the thought of cutting. Another demo punched her numbers out with the wide oval punch and EUREKA...that is right up my alley...you know how lazy I can be! So, I applied the numbers to the Certainly Celery DSP and punched them out with the wide oval punch and punched out a piece of the magnet paper (which already has adhesive on it - how convenient) and it was completed so easily!

P1010036_edited P1010011_edited

I made a scalloped envelope using Real Red Prints DSP (also retired) and my Big Shot to hold all the extra numbers. I took some large felt flurries and put a Build a Brad through them and also punched out a 1/2" circle of magnet to attach to the back to add some fun decorations.

P1010038

I'm sure these won't hold up anything but themselves, but that small piece of magnet is perfect! I hadn't really finished the board (and I may still add some decorations), but my kids already decided what the bottom was for:

P1010035

Their wish lists!!! They promptly sat down to compile their list of most desired Christmas items just to add to the countdown board! Parker wants me to make another one to countdown to his birthday (December 22). I told him he'll just have to practice his math skills! I used Real Red 5/8" grosgrain ribbon to hang my board. You can apply the Christmas Countdown to a tile, to a wooden frame, or anything else you can find! Let the countdown begin!

P1010008_edited

Tuesday, October 21, 2008

Happy Birthday Stampin' Up!

This year is Stampin' Up!'s 20th anniversary!  And with every great celebration....great gifts for everyone!  :-)  Stampin' Up! is offering 20% off all the birthday/celebration stamps with a $20 purchase (hee, hee, 20, 20 and 20!).  We made this project with Party Hearty, one of the sets on sale:

P1010033

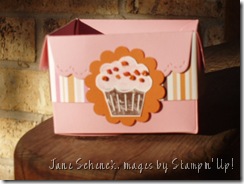
This little box was made with the Scallop Envelop die that goes with the Big Shot!  Again, some other more creative person came up with this idea...I wish I could get my brain to work like this!!!!!  Good thing all my imitation skills are completely functional!  This uses 4 of the envelopes taped together to make the box!!  How incredibly clever eh??!!  Interested in this stamp set or any of the others that are on sale?  You can see which sets are on special this month by clicking on the Happy Birthday card to the left!  If you want to place an order for any of the sets or anything else for that matter, you can contact me or order yourself online - the link is also to the left!  Here are the details for this box:

Paper: Pretty in Pink, Whisper White, Pumpkin Pie Cardstock, Sweet Always Designer Series Paper; Ink: Pretty in Pink and Chocolate Chip Stampin' Write markers; Accessories: Big Shot, Scallop Envelope die, Scallop Circle punch, Paper Snips, Orange Bead Duos, Tombo Multipurpose Adhesive, Sticky Strip, Stampin' Dimensionals.

We put a cute square of Designer paper on the inside, which really adds to the design of it all.  But I forgot to take a picture of the box from above.  I'll try to remember to do that and add that for your recreating inspiration!

Sunday, October 19, 2008

Halloween Projects at last!

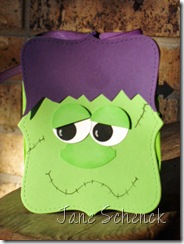
Here are a couple of projects we made at Stamp Club this week. This is Frankie!

P1010030_edited P1010031

P1010032_edited

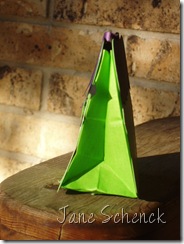
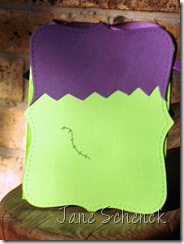
This is a treat bag made with some mini bags I found at the craft store and the Top Note die and my Big Shot!! How fun is he?? Of course, some other ingenious person came up with this idea, and I dutifully copied him cuz I LOVE him!!! It really is pretty easy. This bag is created along the same lines as the "genie bag" where we line the front and back side of a bag with cardstock. In this case the cardstock is die cut in the great shape created with the Top Note die!! Here are the details.

Paper: Green Galore, Elegant Eggplant, Whisper White, Basic Black Cardstock; Ink: Green Galore Classic Ink; Accessories: Big Shot, Top Note die, Elegant Eggplant grosgrain ribbon, Basic Black Stampin' Write marker, Scallop Edge punch (the bag - you can't see this, but my recipient will see it when the bag is opened to reveal the yummy goodies!!), 1" circle punch, 1/2" circle punch, White gel pen, scissors, and Round Tab punch. No stamps (gasp)!

Of course you can all see why I would never succeed in a career as a hairdresser!! I can't even cut Frankie's hair in a style that is suitable for him!! I know he loves a cock-a-mamie style, but my hack job goes on a slant. So sorry Frankie!!

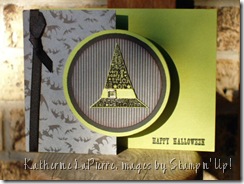
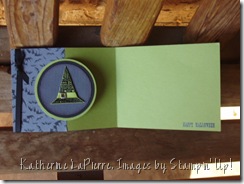
Here's another Halloween project from club. This one is completely copied from my friend Katherine LaPierre. I participate in a swap with some local demonstrators each time Stampin' Up! puts out some new stamps for us to play with. We each choose a different set and make 3 samples with it and swap them out with each other so we all end up with a variety of samples using many different stamp sets. This time around we all used stamps from the Holiday Mini Catalog. (Let me know if you would like a copy of this - my mailings didn't go out this time around - 00ps!) We have so much fun doing this because we also pair the actual swapping with a get together at a local restaurant. When you put together swapping, dining and great fellowship and conversation you get a really fun time!!! :-) Here's the card inspired by Kat:

P1010036_edited P1010037

This card has a great fold that is created with the help of the Coluzzle (stop cursing at me!!) :-) Some of my stampers really hate the Coluzzle, but don't hate them, they don't know any better! I'm working on them!! :-) Here are the details of the card:

Paper: Old Olive, Basic Black Cardstock, Ghostly Greetings Designer Series Paper; Ink: Versamark Ink; Stamps: Eat, Drink and Be Scary, All Holidays; Accessories: Black grosgrain ribbon, Old Olive grosgrain ribbon, Black Embossing Powder, Ice Square Rhinestone brads, Coluzzle.

We made one more project I'll share with you tomorrow! Have a good one!

Friday, September 19, 2008

Spooky Spider!

P1010006

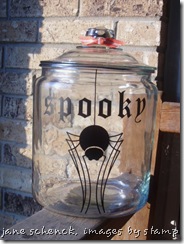
Have you checked out Decor Elements yet?  Well, these great designs aren't just for walls!  October 1st Phase II Decor Elements will be available, and you are going to love them!  But, starting today you can get this fantastic image.  Spooky spider comes in two colors (black or white) and three sizes, this is the medium image.  Hurry they're only available until October 31st!


Black White Description Price
114761 114764 Spooky Spider Décor Elements (S) $5.95
114762 114765 Spooky Spider Décor Elements (M) $10.95
114763 114766 Spooky Spider Décor Elements (L) $14.95

This ginormous glass jar is from Target...it holds lots of goodies!